What it is?
This is a small library that will allow the elements of your tape to move in a given direction at different speeds, and with the effect of teleportation, with the ability to specify timing function for motion like on the Bezier curve.
Before use:
- This plugin does not style the tape container and its internal blocks, but only makes them move.
- For the teleportation effect, the plugin creates a copy of the element, which simulates the element from the other end, after the full passage of the tape, the original element is moved to the place of copy.
- Due to the fact that the plugin calculates the distances for the path, you need to follow some style rules for the correct use of the plugin, which are described #below.
- If you need a simple slider, it is better to choose another plugin.
Install:
Usage:
Note
For the plugin to work properly, it needs to be wrapped in a "load" event because it needs to load the entire page to calculate the size.
Advanced:
Don't ignore the comments, they can help you better understand what's going on ;)
Note
Note the use of ShiftX and ShiftY, they are described here.
Read about the peculiarities of using linear functions here
How it works:
When a ribbon element reaches the edge, it triggers an event that creates a complete clone of that element at the opposite edge, according to the principle of the cloneNode(deap) method then, when the element is completely hidden behind the horizon, it moves to the place of the cloned element (it moves, not replaces it, in the document the original element remains in place) and the clone in turn is destroyed. Thus it is necessary to understand that when the clone is created it has no events of the original element, and also once again loads all resources which are in the original on type of pictures.
Documentation
Description of fields and methods and behavior when manipulating them.
Property
The list of possible properties at initialization of the designer.
wrapper: DOM Element object
The DOM Element of the ribbon, all the elements it contains will be ribbon elements. For the correct operation of this container, its position must be different from position: static. Read about the features of ribbon styling for the correct operation of the plugin #here
direction: Left | Right | Up | Down
The field responsible for the direction currently has 4 directions, by default Right.
Note
All four classes extend the base Direction class. If you want to change the calculation method, you can expand each of the classes that are placed on the link.
options.shift: ShiftX | ShiftY
The field responsible for the movement of the ribbon for horizontal is ShiftX and vertical ShiftY, default is ShiftX. If you use the Up|Down direction, do not forget to pass options.shift: ShiftY because without it the tape will go accordingly on an x-axis.
options.duration: 20000
The field responsible for the scroll speed of the tape, the default is 20000.
Warning
At very high speeds in the elements of the slider begin to shift, see more about it at the link.
A speed of at least 5000 is recommended for the slider element group.
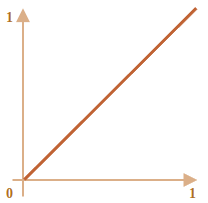
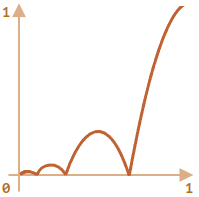
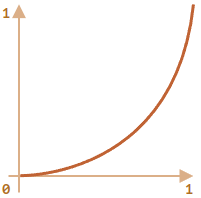
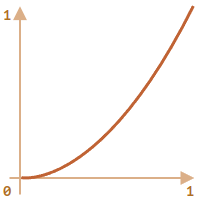
options.timing: bounce | circ | linage | quad
This field is responsible for timing functions for which time will be calculated according to the example of cubic-bezier from css, default linage.
linage:
bounce:
circ:
quad:
You can also write your own timing functions like it:
Note
The first argument can be passed using the bind function:
timing: quad.bind(null, 2)
options.insert: 'append' | 'prepend'
The field responsible for the method of adding clones to the tape is required in some cases which will be described below, default 'append'.
An example in which you will need to use this attribute is if for some reason your content goes from right to left, in which case adding a new item to the end of this list (this is how creating a clone) will break the distance calculation, for example:
justify-content: flex-end
options.insert: 'prepend'
options.insert: 'append'
options.elasticDistance: true | false
This field indicates that you need to calculate the size of the tape, taking into account also the size of its elements, the default is true. Also be sure to indent the first element of the ribbon equal to the distance between the elements otherwise the last and first element will be in the butt.
The contents of the tape are larger than its size:
options.elasticDistance: true
options.elasticDistance: false
options.optimize: true | false
To optimize the work of the plugin, when the option is active, an observer will be thrown on the tape object relative to the window, when the user is not looking at the tape, it will not move, the default is true.
To see the difference just scroll up or down to hide the ribbon, the first ribbon will stay in place while the bottom one will continue to move.
options.optimize: true
options.optimize: false
Methods
List of available methods.
run(): void
Initializes the movement of the tape.
destroy(): void
Destroys the tape at the event and state level before it is run using the run() method.
pause(): void
Pauses the movement of the tape.
resume(): void
Removes the tape from the pause and continues its work from the place where it was stopped.
Application example.
Demonstrate the operation of the tape with the method of pause() and resume() hover the mouse cursor.
Styling tips:
Because the library translates the stylization and shaping of the tape flow to the user, there are some rules that it must follow in order for the tape to behave stably.
The tape must position itself differently from static.
Why do it? - Because the positions of the tape elements calculate their position and the required distance using the offset(Left|Top|Width|Height) properties, and these properties work according to the element in which the position is not static. You can read more at the link.
When adding an element the tape should not move, ie if you use flexbox, justify-content should not be space-(between|around|evenly) or center margin should be fixed, also if the length of the tape is short and it is designed only for the already added number of elements must be disabled for elements flex-shrink: 0; that is, they did not decrease by default.
Note
When adding the flex-end property, you need to change the way you add the replica, see the #options.insert property.
Why do it? - Because the elements of the tape calculate their distance during initialization and when the position is shifted, "jumps" will be visible
Do not forget to add to your tape overflow-(x|y) according to the direction, the elements do not disappear by themselves :)